Understanding workflows

What are workflows?
Workflows are the foundation of Document Studio, allowing you to control how different types of documents are extracted.
Put simply, a workflow is a set of instructions that determines how a certain type of document will be extracted. Because different document types have different extraction needs, each workflow is scoped to a specific module and submodule.
Workflows allow you to customise extraction for one document type without affecting others. For example, you might create a workflow specifically for purchase invoices in the purchasing module, without affecting how supplier credit notes or delivery dockets are extracted.
The workflow table
When you open Document Studio, you'll see a table of all your team's workflows. For each workflow, you can see:
- The module and submodule it applies to
- The workflow name
- The active status
- The editable status
- The date it was created
- The date it was last updated
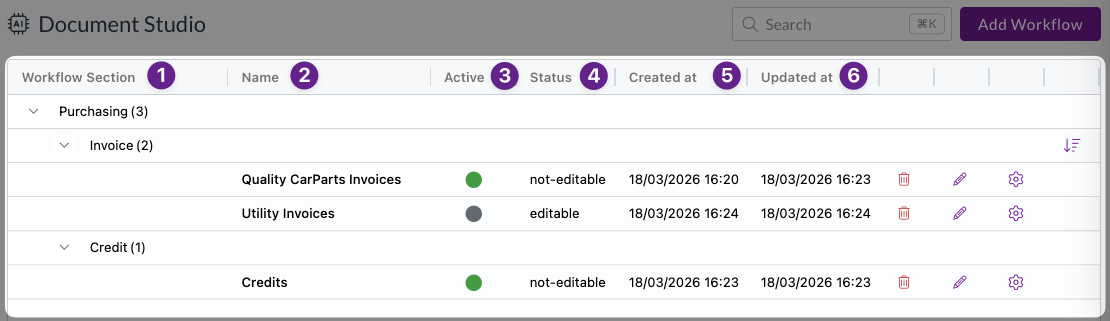
From this table view, you can:
- Delete a workflow using the delete button
- Edit a workflow's name and module settings using the edit button
- Open the workflow editor by clicking the settings button

Opening a workflow will open the workflow editor, allowing you to see exactly how the workflow extracts documents, and make any required changes. Let's dive deeper.
Anatomy of a workflow
The workflow editor has two main areas:
- Document parser (left)
- This is where you view and edit the prompts that run against each document when it arrives in Zudello.
- File viewer (right)
- This is where you view the documents you're testing against. You can see the original file and the OCR output, which shows the raw text that Zudello's OCR system has extracted from the document.
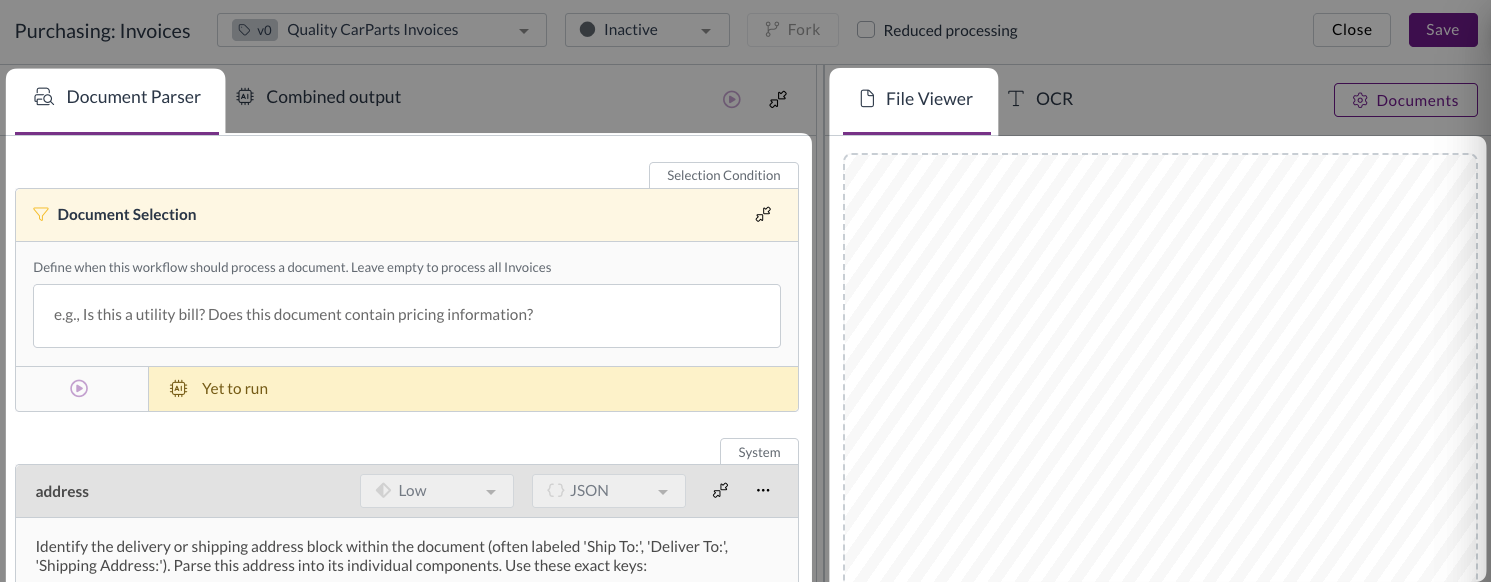
Document selection condition
At the top of the document parser is the document selection condition. This is different from the other prompts in the workflow. Rather than telling Zudello how to extract a field, it tells Zudello whether this workflow should run on a given document at all.
The document selection condition must always resolve to a yes or no answer. If the answer is yes, the workflow runs. If the answer is no, it doesn't.
Leave the document selection condition blank if you want the workflow to process all documents in the assigned module and submodule. Add a condition if you only want the workflow to run on certain documents.
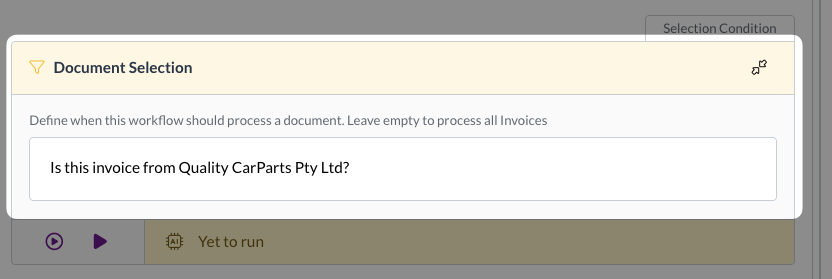
Examples of valid and invalid document selection conditions
- Is this a utility bill? - Valid ✅
- Clear, concise question that can only result in a Yes or No answer
- Does this document contain line items with either item codes or stock codes? - Valid ✅
- Clear, concise question that can only result in a Yes or No answer
- This workflow should run on all utility invoices - Invalid ❌
- Not a question, so will not provide a Yes or No answer
- If the invoice has stock codes please run - Invalid ❌
- Not a question, so will not provide a Yes or No answer
- Is this an invoice? Is the invoice from Appleby Co? - Invalid ❌
- Multiple questions, so there are more possible answers than simply Yes or No
Prompts
Below the document selection condition, you'll find a prompt for each field that Zudello extracts. Each prompt tells Zudello what to look for and how to interpret what it finds. We cover how prompts work in more detail in the next article, Understanding prompts.
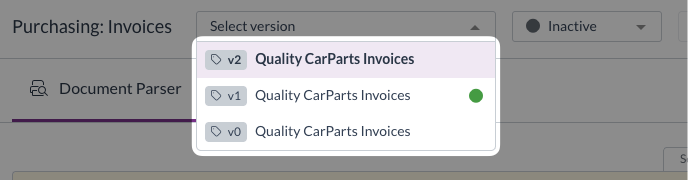
Workflow versions and forking
You can only have one active version of a workflow running at any time, and you cannot edit an active workflow directly. To make changes, you need to fork the workflow.

Forking creates a new version of the workflow and copies across all the current settings. The original version remains active while you work on the new one, ensuring your testing does not disrupt the documents your team is currently processing.
You can then edit the new workflow version, test it, and activate it when you're happy. Activating the new version automatically deactivates the previous one.
To identify which version is active, look for the green dot in the workflow version drop-down. You can activate any previous version at any time. There's no requirement to always use the most recent one. If an older version was performing better, you can revert to it while you work on a new version.
For instructions on creating, forking, and editing workflows, see Creating and editing workflows.
Testing
Uploading test documents
Uploading test documents allows you to test your changes against live documents before activating a new version or workflow. Use a variety of documents when testing. Ideally, use a sample that represents the range of documents your workflow will process in production. This helps you confirm that improving extraction for one document isn't degrading it for another.
For a guide on how to upload testing documents, see Uploading test documents.
Running tests
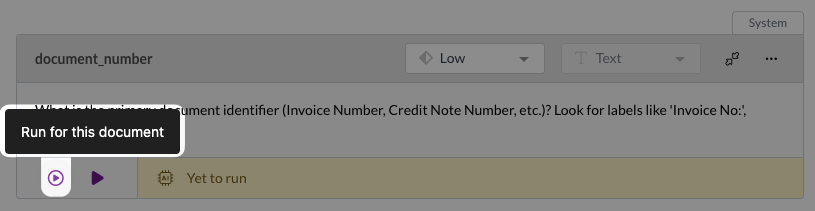
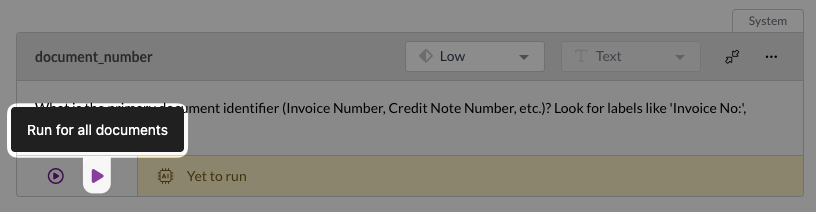
Document Studio includes two testing options for each prompt:
- Run for this document
- Runs the prompt against the document currently open in the file viewer. Use this for quick checks while you're refining a prompt.
- Run for all documents
- Runs the prompt against all documents you've uploaded to the workflow. Use this to check that your changes work correctly across a range of documents before activating.
The output box beneath each prompt shows the result of the test for the document currently selected in the file viewer.

What's next?
Now that you understand workflows, you can move on to:
→ Understanding prompts
→ Creating and editing workflows
Need help?
Contact your organisation administrator or Zudello support for assistance with Document Studio.